Sunday, May 24, 2020

Fire Features and Outdoor Heating


One of the most popular trends at the moment is the installation of a fire pit. The notion of gathering around a warm, glowing fire is very appealing for evening entertaining.
This can be accomplished with several different options. The first consideration is fuel type: wood burning, natural gas or propane. Running a natural gas line can be expensive and hard to run if your paving is already installed. However, if you are just re-doing your landscape area and the ground is
clear of obstructions then running the gas line is a great way to go. Gas is clean burning and
easy to use plus relatively low cost to run. Wood burning is lovely but affects the air quality and it
is somewhat of a hassle to obtain wood or gather it. Any wood burning fire pit should have a spark
arresting screen.
Propane is a low cost option and the portable tanks last fairly well. Most prefab. fire pits use
propane, but may have an option to hook up to a gas line also. Occasionally, you will find a unit that uses butane. These are not always a good option as butane isn't as readily available, the tanks are small, and empty quickly.

Normally, fire pits are lined with fire proof stone, block or brick and have a raised edge so kids and
adults don't fall into the area. The low wall or edge around the unit acts as a foot rest, seat or
place to set food and drinks. (see examples to follow).
The exterior of the wall can be stone, block (stuccoed or veneered with stone), brick or
even wood, as the inside has the fire proof brick.  The Cap of the wall should be also fireproof-
stone, brick, cast concrete or interlocking pavers.
I like to set the height of the fire pit at 14-16" off patio level to be below seat height, so that you can see the fire and rest feet on edge.

The fire table is another interesting concept for a fire feature. These are normally at dining table
height and have a center burner powered by a propane tank below (in a housing). These units don't give off much heat but are a fun dining experience.
Both the fire pit and the fire table have the option of a cover for the fire area so the table and pit
can act as a regular piece of furniture.

Fireplaces built outdoors are lovely and make a backdrop for the garden. This is a very pricey option and not as easy to gather around for more than a few people.
They are custom built but there are some prefab. units available (they can be set on built in hearths) that lower the cost. These run on natural gas or propane and have a "faux" chimney- they vent out the side
or back. I have included photos to follow.

There are some fabulous combinations for fire and water features that I have included too.
These are really pretty by swimming pools and patio areas. The fire features and water features
are normally self contained so one can be set inside the other! Cool! These run on natural gas or propane and the water feature is electric. Plumbing is in a separate housing.

The other option for outdoor heating are portable or mounted heaters. Many restaurants have these and homes have the option also. Most of the stand heaters can be moved and have a space for the propane tank, while the bar shaped mounted heaters can be electric, natural gas or less commonly- propane.

The concept of heating the outside world is fairly flawed as the heat dissipates quickly.
Seating should be close- with in 2-3' of the unit and you should be prepared for uneven distribution of heat.
The ambiance is more the point of fire features and entertainment value.
 Heaters tend to heat the head and shoulders well while leaving the legs and ankles open to drafts. A lap rug or blanket might be just the thing for the lower body!

Fire features and heaters should be used with caution and need to follow all city rules and regulations.
Gas and Electrical lines should be installed by licensed professionals. And custom units need skilled
craftsman also. Enjoy safely and stay warm!

Prefabricated Fireplace with custom veneer and hearth or seat. Also a prefab. and hearth set in place.
Prefabricated Fireplace- notice the fire jewels inside the fire area. Very pretty


Custom double sided fireplace. Gorgeous, but according to home owner, not a very good
source of heat.

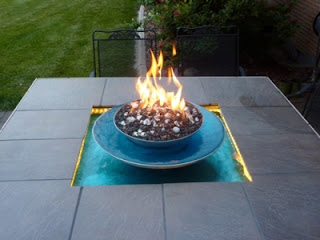
 This is a prefabricated fire bowl. Nice shape and look but edge is narrow for setting things on.
Below is a prefabricated fire pit with propane tank hidden in base. Available through American
Leisure Patio.
Custom built fire pit and seat wall. Tile cap and face band with stuccoed block base
 Custom built in fire pit with stone cap. Nice height and look.
 Examples of fire tables. Propane tank is hidden in base.
 Now here is an interesting unit for the rustic garden! Fun that is space conservative and unusual.

 Beautiful Bougainvillea draped over a custom built fireplace with southwest look.
Stuccoed block with cast concrete seat cap.
 Electric bar heaters mounted in patio cover and arbor

 Movable propane outdoor space heaters


Examples of fire features combined with water features


See also my patio furniture blog for other examples


Labels: ,

Saturday, April 11, 2020

Shading Patio Areas

Living in the San Francisco Bay Area means lots of sun almost year round. Some patios are even hot and sunny in the winter here! Depends on the orientation, house walls blocking wind or adjacent structures reflecting heat, but its pretty common. So its handy to have a ready area of shade for most patios unless overhanging trees give good shade.
 We have even installed patio covers because of trees! The dropage of a live oak or silk tree is no joke. They can drop quite a bit just in one day.

Photos to follow

There are some various solutions to adding shade to patios. The most common and movable is an umbrella. A prefabricated item that is movable and of varied cost. Umbrellas normally need a base-
also movable and should be sized to the diameter of the umbrella. The downfall of the umbrella is the
small area of shade and the center pole. Manufacturers have worked on this quite a bit and now they have something called a cantilevered umbrella. I call them hanging umbrellas because when they are
down they hang off the overhead arm of this type of umbrella (see photo). These types of umbrellas can be large- 10-13' and don't have a center pole but instead have an overhead arm, as I mentioned,
that the canopy hangs from. They have a very large base so we often put a sleeve in the patio/an ground tube to inset the pole and avoid the base.
Best to put you umbrella down in winds and store inside or in shed for the winter.
Most can be tilted to help with afternoon setting sun. Many have lights in them which is a great
feature. The canopies of best quality Umbrellas are made from Sunbrella fabric. Big box stores carry umbrellas of many types. You can get a good quality type from Frontgate, Patio World, American Leisure Patio or similar high end dealers.

Another popular item for patio shade has been the shade sail. This is a triangle of Sunbrella fabric
mounted to the home or posts and tensioned to not sag. These have a nice contemporary look and
can be taken down in winter. They are available from awning companies and online. They can overlap and most are custom made so if you want to play with the shape that is possible.
I think it is best to run a vinyl coated cable to eye bolts in wall or post and put a tensioner on the
cable. hang the sail from the eye bolts too and use cables to give extra points of clipping sail edges.
This also allows you to string lights on the cables as desired.
These can be quite large and with multiples you can cover a lot of area. They are also a good temporary solution until trees fill in for shade, or as noted above to protect patio from tree droppings.

The next option for shade is a retractable awning. These are mounted above the doors and windows
on the house walls or on top of the eave on the roof. The biggest advantages that I can see of an awning is the absence of posts. Arbors have posts that can impede layout of furniture on a patio
so not having posts is helpful. I also like the ability to roll out the awning a few feet or all the way.
This allows light into the rooms. Awnings now have bending arms much like our elbows. The awnings can go out to 12-14'. The distributor can provide the width on the house wall as needed for
coverage. Some folks don't like the look of them so you need to decide for yourself. The awnings
should be retracted in wind and winter. The have a housing on the wall for winter. They are available as electric or manual. Save yourself some money and get the manual so you don't need to replace the
motor.

In my business we build a lot of Arbors- also know as trellis', pergolas, or patio covers.
They are normally custom built on site from wood but not always. Some are prefabricated kits and
vinyl and metal are also available for awnings. A traditional Arbor is a slatted wood roof that lets
air circulate. They can be natural wood i.e. Cedar or Redwood  sealed or painted to protect the wood.
Do not leave as raw wood due to the UV and weather deterioration- Arbors become unsightly and wear out quickly if left untreated.
Pressure treated wood should not be used as it doesn't accept seal or paint, and is also not good
quality or good looking. Folks have become very fond of having solid roofs outside so sometimes
we will use flat plastic sheeting on top (from Tap Plastics). These sheets aren't really visible and do
not yellow. They are translucent. The arbor should have a slight pitch for drainage. There are still some fiberglass wavy patio cover panels around or the aluminium version but that's pretty dated.
Prefabricated kits can be good if the materials are sturdy and good quality. Keep in mind all arbors should have anchors drilled into the patio or set with a pier when the patio is built. An arbor can be tipped by strong winds, people hanging things on them or other action.
There are codes and conditions set on placement of arbors in yards by the city and usually require a permit so be fore warned.

labels and notes below photos

 Arbor kit with sliding awning cloth shades
 Typical Redwood Arbor stain-sealed in a dark walnut color
 Small Arbor will have a vine growing over it for shade
 Cool Umbrella with flat side to set against a wall
 Typical Umbrella in a table- pretty small for that table!
 Shade Sails supported to steel posts. These give afternoon shade to this area
 Nice example of alternate shapes for these Shade Sails
 Quite a few commercial properties use these. Good example of mounting to building and posts.
 Retractable Awning with good coverage

 This photo shows the support arms of the retractable awning

 This is known as an "eyebrow" awning or window shade. Helpful for those hot windows!\
 Solid Roofed Patio cover (sometimes called a gazebo)- Costco has a similar one too
 Wavy fiberglass panels keep out rain but are kind of a dated look. Nice Arbor

 Some homes have a lot of trouble with the setting sun in the home and patio. This look like its on
a manufactured home but is one solution. We use outdoor drop blinds on Arbors to do the same thing.


Example of a vinyl arbor. This one may have opening and shutting louvers as the roof.
An Australian Company markets their louvered arbors in the U.S. and they are at a lot of
home shows- theirs have metal louvers.

Hope these notes on shade structures are of some help. Its one of those items that makes the patio
easier to use in Summer and helps us avoid the direct sun and protect our skin and eyes.
On my projects there is usually multiple solutions we can use and we narrow it down by look, cost, maintenance and space.

One last photo of a cantilevered umbrella- this one is 13'. They come with the valence on the edge or without. The Umbrella pictures were taken at American Leisure Patio in San Jose (they have multiple locations).


Labels: ,

Thursday, February 23, 2012

Pool Remodels

Did you know that Lois designs pool remodels? Well yes, yes I do. Here is an example of a pool in need of a facelift.  The remodel will include a new waterfill spill wall at the back, an added spa area, new plaster, coping and pool deck. The overall cost will be around 15-20k.

Usually the discussion begins as a pool ages and needs work- new plaster, leaking bond seal, cracking or pop off tiles, rough surfaces or cracking pool deck. Some of these things can just be repaired but when the overall pool needs updating then the discussion of whether to do the work or just fill it in comes up.

I have been involved in both scenarios and it usually depends on what fits the family. In terms of resale value it is not really a selling point to have a pool as many buyers won't want it where as others will.
If you have a pool or have had one then you know that they are a lot of maintenance and cost around $30 a month in electricity to run the filters- heating adds onto this cost. Water evaporation is another cost as well as chemicals and algea control.   If your family does not use the pool and you need more general area in the yard for garden or patio then filling it in is a good option.
Filling in a pool usually costs around 8-13K and the process varies with different cities specs., access and pool type. This type of work is done by an excavating contractor or landscape contractor. As a landscape designer I give options and a plan for what will be in place of the old pool.

Pool remodels can revamp a dated pool and give it a more modern look.  Many of the pools I have worked on take advantage of the new pool interior finishes i.e. pebbletec or pebblesheen which give the pool a more natural look "more like a pond" than a pool.

A great website where you can see pool finishes and tile is the National Pool Tile website which allows you too insert different samples into a pool template to see different looks.

www.npt.com

Often new coping and pool deck are all that is needed. In our old pool we had exposed aggregate concrete as the pool deck which was awful as it was rough and very hard on the feet- not slippery though!  New pool decks can take advantages of the more recently introduced stamped concrete or pavers that have a much more elegant look and are easy on the feet. Glare can also be reduced with a more neutral pool deck color and interior finish color.

The planted area around the pool can get quite worn looking and redoing those plantings areas can really improve the look without a huge budget.  With good soil prep., automatic watering and plants that fit the areas the whole backdrop of the view of the pool is improved.

If you are considering redoing a pool area and want to consult on options let me know and we can brainstorm some ideas!

Labels: